Práctica con Qiskit: Hello World - Qiskit Patterns
En este notebook vas a recorrer un flujo de trabajo de Qiskit Patterns y usarás la primitiva Sampler de Qiskit.
Este tutorial incluye parcialmente contenido de IBM Quantum Documentation: Hello World.
Enlaces útiles:
- Por favor, crea una cuenta de IBM Cloud para acceder a la IBM Quantum Platform.
- Para quienes tengan un correo universitario: obtén un código de característica aquí para ampliar tu período de prueba gratuito.
- Para quienes no tengan correo universitario: instrucciones para activar tu cuenta. Activa tu cuenta completamente registrando una tarjeta de crédito. Tu tarjeta de crédito no se carga en este proceso ni de forma aleatoria después del registro. Esta activación te permite seguir accediendo a tus recursos gratuitos en IBM Cloud y en la plataforma IBM Quantum una vez que termine el período de prueba (30 días).
- Usaremos una plataforma basada en la nube para configurar un entorno de codificación. Puedes usar QBraid o Google Colab.
- Después de este notebook, veremos el protocolo de Teletransportación Cuántica.
Más enlaces: comunidad Qiskit y recursos de aprendizaje adicionales:
- Grok sphere
- IBM Quantum Composer
- IBM Quantum Learning
- Qiskit Global Summer School 2025 lectures
- Qiskit v2.X Certification
- Qiskit advocate program
- Quantum summer internships
- Qiskit YouTube
Instalar Qiskit
Puedes usar un entorno de jupyter lab en línea (consulta la guía Entornos de laboratorio en línea) o instalar Qiskit localmente.
Sigue la guía de instalación de Qiskit Instalar el SDK de Qiskit y el cliente de Qiskit Runtime para completar los siguientes pasos:
-
Instala Qiskit incluyendo los paquetes de visualización adicionales:
pip install qiskit[visualization] -
Instala qiskit-ibm-runtime:
pip install qiskit-ibm-runtime -
Instala jupyter:
pip install jupyterComprueba que la versión de Python que estás usando en tu entorno es python>=3.10, para asegurarte de que es compatible con la última versión de Qiskit:
# Added by doQumentation — required packages for this notebook
!pip install -q IPython
from platform import python_version

print(python_version())
3.13.7
Si necesitas actualizar Python y no sabes cómo hacerlo, consulta esta guía sobre cómo actualizar Python según tu sistema operativo: How to update Python
%pip install qiskit[visualization]
%pip install qiskit-ibm-runtime
%pip install
%pip install qiskit-aer
zsh:1: no matches found: qiskit[visualization]
Note: you may need to restart the kernel to use updated packages.
Requirement already satisfied: qiskit-ibm-runtime in /Users/astricornish/miniforge3/envs/um-qiskit/lib/python3.13/site-packages (0.43.0)
Requirement already satisfied: requests>=2.19 in /Users/astricornish/miniforge3/envs/um-qiskit/lib/python3.13/site-packages (from qiskit-ibm-runtime) (2.32.5)
Requirement already satisfied: requests-ntlm>=1.1.0 in /Users/astricornish/miniforge3/envs/um-qiskit/lib/python3.13/site-packages (from qiskit-ibm-runtime) (1.3.0)
Requirement already satisfied: numpy>=1.13 in /Users/astricornish/miniforge3/envs/um-qiskit/lib/python3.13/site-packages (from qiskit-ibm-runtime) (2.3.3)
Requirement already satisfied: urllib3>=1.21.1 in /Users/astricornish/miniforge3/envs/um-qiskit/lib/python3.13/site-packages (from qiskit-ibm-runtime) (2.5.0)
Requirement already satisfied: python-dateutil>=2.8.0 in /Users/astricornish/miniforge3/envs/um-qiskit/lib/python3.13/site-packages (from qiskit-ibm-runtime) (2.9.0.post0)
Requirement already satisfied: ibm-platform-services>=0.22.6 in /Users/astricornish/miniforge3/envs/um-qiskit/lib/python3.13/site-packages (from qiskit-ibm-runtime) (0.69.0)
Requirement already satisfied: pydantic>=2.5.0 in /Users/astricornish/miniforge3/envs/um-qiskit/lib/python3.13/site-packages (from qiskit-ibm-runtime) (2.12.2)
Requirement already satisfied: qiskit>=1.4.1 in /Users/astricornish/miniforge3/envs/um-qiskit/lib/python3.13/site-packages (from qiskit-ibm-runtime) (2.2.1)
Requirement already satisfied: packaging in /Users/astricornish/miniforge3/envs/um-qiskit/lib/python3.13/site-packages (from qiskit-ibm-runtime) (25.0)
Requirement already satisfied: ibm_cloud_sdk_core<4.0.0,>=3.24.2 in /Users/astricornish/miniforge3/envs/um-qiskit/lib/python3.13/site-packages (from ibm-platform-services>=0.22.6->qiskit-ibm-runtime) (3.24.2)
Requirement already satisfied: PyJWT<3.0.0,>=2.10.1 in /Users/astricornish/miniforge3/envs/um-qiskit/lib/python3.13/site-packages (from ibm_cloud_sdk_core<4.0.0,>=3.24.2->ibm-platform-services>=0.22.6->qiskit-ibm-runtime) (2.10.1)
Requirement already satisfied: six>=1.5 in /Users/astricornish/miniforge3/envs/um-qiskit/lib/python3.13/site-packages (from python-dateutil>=2.8.0->qiskit-ibm-runtime) (1.17.0)
Requirement already satisfied: charset_normalizer<4,>=2 in /Users/astricornish/miniforge3/envs/um-qiskit/lib/python3.13/site-packages (from requests>=2.19->qiskit-ibm-runtime) (3.4.4)
Requirement already satisfied: idna<4,>=2.5 in /Users/astricornish/miniforge3/envs/um-qiskit/lib/python3.13/site-packages (from requests>=2.19->qiskit-ibm-runtime) (3.11)
Requirement already satisfied: certifi>=2017.4.17 in /Users/astricornish/miniforge3/envs/um-qiskit/lib/python3.13/site-packages (from requests>=2.19->qiskit-ibm-runtime) (2025.10.5)
Requirement already satisfied: annotated-types>=0.6.0 in /Users/astricornish/miniforge3/envs/um-qiskit/lib/python3.13/site-packages (from pydantic>=2.5.0->qiskit-ibm-runtime) (0.7.0)
Requirement already satisfied: pydantic-core==2.41.4 in /Users/astricornish/miniforge3/envs/um-qiskit/lib/python3.13/site-packages (from pydantic>=2.5.0->qiskit-ibm-runtime) (2.41.4)
Requirement already satisfied: typing-extensions>=4.14.1 in /Users/astricornish/miniforge3/envs/um-qiskit/lib/python3.13/site-packages (from pydantic>=2.5.0->qiskit-ibm-runtime) (4.15.0)
Requirement already satisfied: typing-inspection>=0.4.2 in /Users/astricornish/miniforge3/envs/um-qiskit/lib/python3.13/site-packages (from pydantic>=2.5.0->qiskit-ibm-runtime) (0.4.2)
Requirement already satisfied: rustworkx>=0.15.0 in /Users/astricornish/miniforge3/envs/um-qiskit/lib/python3.13/site-packages (from qiskit>=1.4.1->qiskit-ibm-runtime) (0.17.1)
Requirement already satisfied: scipy>=1.5 in /Users/astricornish/miniforge3/envs/um-qiskit/lib/python3.13/site-packages (from qiskit>=1.4.1->qiskit-ibm-runtime) (1.16.2)
Requirement already satisfied: dill>=0.3 in /Users/astricornish/miniforge3/envs/um-qiskit/lib/python3.13/site-packages (from qiskit>=1.4.1->qiskit-ibm-runtime) (0.4.0)
Requirement already satisfied: stevedore>=3.0.0 in /Users/astricornish/miniforge3/envs/um-qiskit/lib/python3.13/site-packages (from qiskit>=1.4.1->qiskit-ibm-runtime) (5.5.0)
Requirement already satisfied: cryptography>=1.3 in /Users/astricornish/miniforge3/envs/um-qiskit/lib/python3.13/site-packages (from requests-ntlm>=1.1.0->qiskit-ibm-runtime) (46.0.2)
Requirement already satisfied: pyspnego>=0.4.0 in /Users/astricornish/miniforge3/envs/um-qiskit/lib/python3.13/site-packages (from requests-ntlm>=1.1.0->qiskit-ibm-runtime) (0.12.0)
Requirement already satisfied: cffi>=2.0.0 in /Users/astricornish/miniforge3/envs/um-qiskit/lib/python3.13/site-packages (from cryptography>=1.3->requests-ntlm>=1.1.0->qiskit-ibm-runtime) (2.0.0)
Requirement already satisfied: pycparser in /Users/astricornish/miniforge3/envs/um-qiskit/lib/python3.13/site-packages (from cffi>=2.0.0->cryptography>=1.3->requests-ntlm>=1.1.0->qiskit-ibm-runtime) (2.23)
Note: you may need to restart the kernel to use updated packages.
[31mERROR: You must give at least one requirement to install (see "pip help install")[0m[31m
[0mNote: you may need to restart the kernel to use updated packages.
Requirement already satisfied: qiskit-aer in /Users/astricornish/miniforge3/envs/um-qiskit/lib/python3.13/site-packages (0.17.2)
Requirement already satisfied: qiskit>=1.1.0 in /Users/astricornish/miniforge3/envs/um-qiskit/lib/python3.13/site-packages (from qiskit-aer) (2.2.1)
Requirement already satisfied: numpy>=1.16.3 in /Users/astricornish/miniforge3/envs/um-qiskit/lib/python3.13/site-packages (from qiskit-aer) (2.3.3)
Requirement already satisfied: scipy>=1.0 in /Users/astricornish/miniforge3/envs/um-qiskit/lib/python3.13/site-packages (from qiskit-aer) (1.16.2)
Requirement already satisfied: psutil>=5 in /Users/astricornish/miniforge3/envs/um-qiskit/lib/python3.13/site-packages (from qiskit-aer) (7.1.0)
Requirement already satisfied: python-dateutil>=2.8.0 in /Users/astricornish/miniforge3/envs/um-qiskit/lib/python3.13/site-packages (from qiskit-aer) (2.9.0.post0)
Requirement already satisfied: six>=1.5 in /Users/astricornish/miniforge3/envs/um-qiskit/lib/python3.13/site-packages (from python-dateutil>=2.8.0->qiskit-aer) (1.17.0)
Requirement already satisfied: rustworkx>=0.15.0 in /Users/astricornish/miniforge3/envs/um-qiskit/lib/python3.13/site-packages (from qiskit>=1.1.0->qiskit-aer) (0.17.1)
Requirement already satisfied: dill>=0.3 in /Users/astricornish/miniforge3/envs/um-qiskit/lib/python3.13/site-packages (from qiskit>=1.1.0->qiskit-aer) (0.4.0)
Requirement already satisfied: stevedore>=3.0.0 in /Users/astricornish/miniforge3/envs/um-qiskit/lib/python3.13/site-packages (from qiskit>=1.1.0->qiskit-aer) (5.5.0)
Requirement already satisfied: typing-extensions in /Users/astricornish/miniforge3/envs/um-qiskit/lib/python3.13/site-packages (from qiskit>=1.1.0->qiskit-aer) (4.15.0)
Note: you may need to restart the kernel to use updated packages.
Realizar las importaciones necesarias
Realicemos las importaciones necesarias para este tutorial.
from qiskit import QuantumCircuit, QuantumRegister, ClassicalRegister
import qiskit_ibm_runtime
from qiskit.transpiler.preset_passmanagers import generate_preset_pass_manager
from qiskit_ibm_runtime import SamplerV2 as Sampler
from qiskit.quantum_info import SparsePauliOp
from qiskit.quantum_info import Statevector
from qiskit.visualization import plot_bloch_multivector, plot_state_qsphere
from IPython.display import display, Latex
Configurar tu cuenta de IBM Quantum Platform
Para ejecutar circuitos cuánticos en hardware real, necesitarás una cuenta de IBM Cloud.
Sigue las instrucciones de esta guía Configura tu cuenta de IBM Cloud para completar los siguientes pasos:
- Crea una cuenta de IBM Cloud si aún no tienes una.
- Inicia sesión o crea una cuenta en IBM Quantum Platform con un IBMid.
- Accede a tu panel de IBM Quantum Platform, crea tu token de API y cópialo en un lugar seguro. (Ver primera imagen de referencia a continuación.)
- En la celda de código que sigue a las imágenes de referencia, reemplaza
deleteThisAndPasteYourAPIKeyHerecon tu clave de API. - Ve a la página de Instancias desde el menú principal ☰ y crea tu instancia. Si no formas parte de una institución de Red, elige el plan abierto. (Ver segunda imagen de referencia a continuación.)
- Una vez creada la instancia, copia su código CRN asociado. (CRN son las siglas de Cloud Resource Names, es decir, nombres de recursos en la nube). Es posible que necesites actualizar la página para ver la instancia.
- En la celda de código que sigue a las imágenes de referencia, reemplaza
deleteThisAndPasteYourCRNHerecon tu código CRN.
Nota: Trata tu clave de API como lo harías con una contraseña segura. Consulta la guía Configura tu cuenta de IBM Cloud para obtener más información sobre cómo usar tu clave de API en entornos seguros y no confiables.

#@title personals
your_api_key = "YOUR_API_KEY"
your_crn = "YOUR_CRN"
from qiskit_ibm_runtime import QiskitRuntimeService
# Save your API key to access real devices

your_api_key = your_api_key
your_crn = your_crn

QiskitRuntimeService.save_account(
    channel="ibm_cloud",
    token=your_api_key,
    instance=your_crn,
    set_as_default=True,
    overwrite=True,
)
Crear y ejecutar un algoritmo cuántico simple usando el marco de patrones de Qiskit
El marco conceptual de patrones de Qiskit puede considerarse la anatomía de un algoritmo cuántico.
Los cuatro pasos para escribir un programa cuántico usando los patrones de Qiskit son:
-
Mapear el problema a un formato nativo cuántico.
-
Optimizar los circuitos y los operadores.
-
Ejecutar usando una función primitiva de Qiskit.
-
Analizar los resultados.
Paso 1. Mapear el problema a un formato nativo cuántico
En un programa cuántico, los circuitos cuánticos son el formato nativo en el que se representan las instrucciones cuánticas, y los operadores representan los observables que se van a medir. Al crear un circuito, generalmente crearás un nuevo objeto QuantumCircuit y luego le agregarás instrucciones en secuencia.
Demostración: Construir circuitos cuánticos básicos en Qiskit
Intentemos construir algunos circuitos simples con Qiskit.
# Simple quantum circuit with two qubits and two classical bits

# Create quantum circuit with 2 qubits and 2 classical bits
qc = QuantumCircuit(2)

# Add gates to your circuit
qc.x(0)
qc.s(1)

# Draw the output using MatPlotLib
qc.draw(output='mpl')

# Quantum circuit with a Quantum Register named 'qr' that has two qubits, and a Classical Register named 'cr' with two classical bits

# Create a quantum register with 2 qubits, register label is 'qr'
qreg = QuantumRegister(2)

# Create a classical register with 2 qubits, register label is 'cr'
creg = ClassicalRegister(2)

# Create a quantum circuit with registers qreg and creg
qc = QuantumCircuit(qreg, creg)

# Add gates to your registers
qc.x(qreg[0])

# Draw the quantum circuit
qc.draw(output='mpl')

Ejercicio: Construir circuitos cuánticos básicos en Qiskit
Crea un circuito para el estado de Bell
# Create a new circuit with two qubits
qc = QuantumCircuit(2)

# Add a Hadamard gate to qubit 0
qc.h(0)

# Perform a controlled-X gate on qubit 1, controlled by qubit 0
qc.cx(0,1)

# Return a drawing of the circuit using MatPlotLib ("mpl").
qc.draw('mpl')

El estado inicial del circuito cuántico es el estado .
El estado final es:
# Use Statevector to fetch the statevector of the circuit
sv = Statevector(qc)
sv.draw(output='latex')
Una nota sobre la numeración de bits en Qiskit
Qiskit numera los bits en una cadena de derecha a izquierda. El SDK de Qiskit usa la numeración de bits LSb 0. Al mostrar o interpretar una lista de bits (o qubits) como una cadena, el bit es el bit más a la izquierda y el bit es el más a la derecha. Esto se debe a que normalmente escribimos los números con el dígito más significativo a la izquierda, y en Qiskit, el bit se interpreta como el bit más significativo. Para más detalles, consulta el tema Ordenamiento de bits en el SDK de Qiskit.
#LSB ordering example
qc2 = QuantumCircuit(2)
qc2.x(1)

qc2.draw("mpl")

sv2 = Statevector(qc2)
sv2.draw(output='latex')
¿Necesitamos puertas de medición?
Al crear circuitos cuánticos, también debes considerar qué tipo de datos quieres que se devuelvan tras la ejecución. Qiskit proporciona dos formas de devolver datos: puedes obtener el valor esperado de un observable, o puedes obtener una distribución de probabilidad para un conjunto de qubits que elijas medir. Prepara tu carga de trabajo para medir tu circuito de una de estas dos formas con las primitivas de Qiskit.
- La primitiva
Samplerdevuelve una distribución de probabilidad para un conjunto de qubits que eliges medir. P. ej.:

- La primitiva
Estimatordevuelve el valor esperado de un observable. P. ej.:

Hoy usaremos el Sampler, así que necesitamos agregar puertas de medición a nuestro circuito.
# Use measure_all, which adds a barrier, applies measurement gates on all qubits, creates a classical register called `meas`
qc.measure_all()
qc.draw('mpl')

Paso 2. Optimizar los circuitos para el hardware objetivo
Al ejecutar circuitos en un dispositivo, es importante optimizar el conjunto de instrucciones que contiene el circuito y minimizar la profundidad total (aproximadamente el número de instrucciones) del circuito. Esto garantiza que obtengas los mejores resultados posibles al reducir los efectos del error y el ruido. Además, las instrucciones del circuito deben ajustarse a la Arquitectura del Conjunto de Instrucciones (ISA) del dispositivo backend y deben tener en cuenta las puertas de base y la conectividad de qubits del dispositivo.
El siguiente código instancia un simulador al que enviar un trabajo y transforma el circuito y los observables para que coincidan con la ISA de ese backend. Ten en cuenta que más adelante usaremos un dispositivo real.
# option:
from qiskit_ibm_runtime.fake_provider import FakeTorino
backend = FakeTorino()
print(
    f"Name: {backend.name}\n"
    f"Version: {backend.version}\n"
    f"Native gate set: {backend.operation_names}\n"
)

#to view other properties you can use properties()
# refer to https://docs.quantum.ibm.com/guides/get-qpu-information
Name: fake_torino
Version: 2
Native gate set: ['for_loop', 'delay', 'cz', 'id', 'sx', 'measure', 'reset', 'switch_case', 'if_else', 'rz', 'x']
# Convert to an ISA circuit
pm = generate_preset_pass_manager(backend=backend, optimization_level=3)

isa_circuit_sampler = pm.run(qc)

isa_circuit_sampler.draw("mpl", idle_wires=False)

Paso 3. Ejecutar usando las primitivas de Qiskit
Los ordenadores cuánticos pueden producir resultados aleatorios, por lo que generalmente recopilas una muestra de las salidas ejecutando el circuito muchas veces. Puedes estimar el valor del observable usando la clase Estimator. Sampler se puede usar para obtener datos de un ordenador cuántico. Estos objetos poseen un método run() que ejecuta la selección de circuitos, observables y parámetros (si corresponde), usando un bloque unificado primitivo (PUB).
# Create a sampler instance using the selected backend
sampler = Sampler(backend)

# Run the sampler primitive on ISA circuit for specified number of shots (1024)

job_sampler = sampler.run([isa_circuit_sampler], shots=1024)

# Save the result of the job

result_sampler = job_sampler.result()
Paso 4. Posprocesar los resultados
Este paso implica posprocesar tus resultados. Puedes introducir estos resultados en otro flujo de trabajo para un análisis posterior o preparar una gráfica de los valores y datos clave. En general, este paso es específico de tu problema.
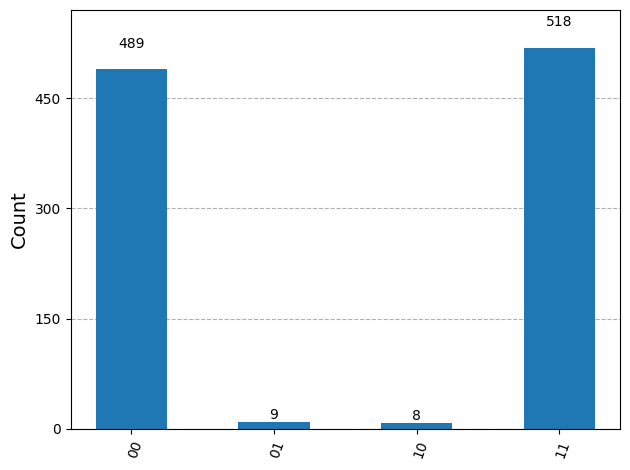
- Para el
Sampler, graficamos la distribución de probabilidad obtenida al muestrear el circuito cuántico tantas veces como los disparos que especificaste usandoplot_histogram.
from qiskit.visualization import plot_histogram

counts = result_sampler[0].data.meas.get_counts()
# Note: meas is the default name of the classical register when using measure_all().
# If you specify a classical register, then use the name you assign

# Plot the result
plot_histogram(counts)
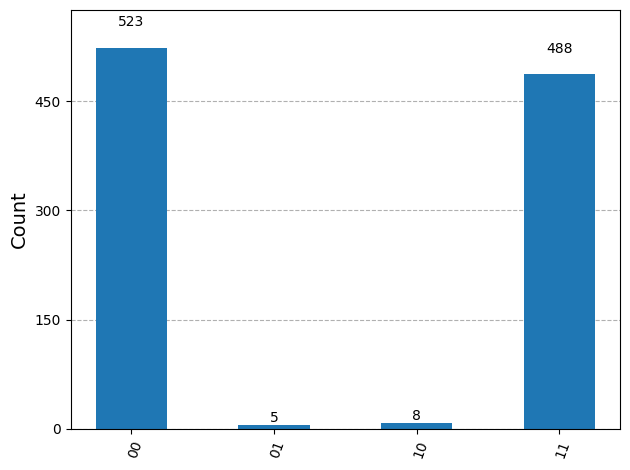
Ejecutar un programa en un dispositivo real
Si quieres ejecutar este código en un dispositivo real, puedes usar el siguiente código.
from qiskit_ibm_runtime import QiskitRuntimeService

# View the list of backends you have access to

service = QiskitRuntimeService()

service.backends()
management.get:WARNING:2025-11-03 14:24:36,838: Loading default saved account
[<IBMBackend('ibm_fez')>,
 <IBMBackend('ibm_brisbane')>,
 <IBMBackend('ibm_torino')>,
 <IBMBackend('ibm_marrakesh')>]
# Get backend
backend_real = service.least_busy(simulator=False, operational=True)

#backend_real = service.backend(name="insert_backend_name") # use this if you want to choose a specific backend

sampler = Sampler(backend_real)

pm = generate_preset_pass_manager(backend=backend_real, optimization_level=3)
isa_circuit = pm.run(qc)

job = sampler.run([isa_circuit], shots=1024)
print(job.job_id)
<bound method BasePrimitiveJob.job_id of <RuntimeJobV2('d444lcg7i53s73e4n6tg', 'sampler')>>
result = job.result()
print(
    f"Name: {backend_real.name}\n"
    f"Version: {backend_real.version}\n"
    f"Native gate set: {backend_real.operation_names}\n"
)
Name: ibm_fez
Version: 2
Native gate set: ['delay', 'cz', 'id', 'sx', 'measure', 'reset', 'if_else', 'rz', 'x']
counts = result[0].data.meas.get_counts()

plot_histogram(counts)
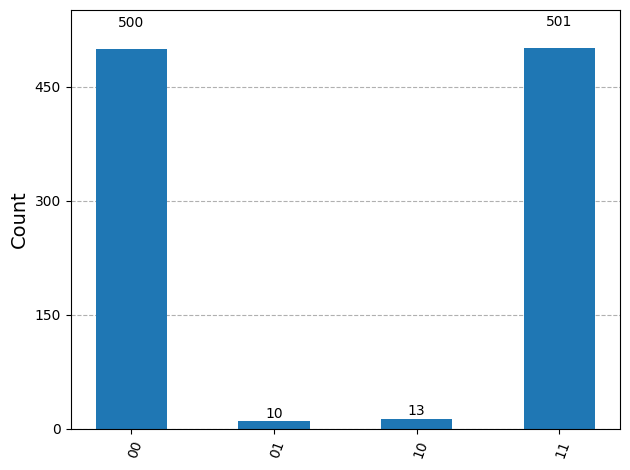
Obtener resultados de un trabajo completado
La celda siguiente muestra cómo puedes obtener resultados de un trabajo completado.
service = QiskitRuntimeService()
retrieved_job = service.job('d40mquhsg33c73dhhs00')
result = retrieved_job.result()
counts = result[0].data.meas.get_counts()
plot_histogram(counts)
management.get:WARNING:2025-11-03 14:24:55,135: Loading default saved account